I have a thing for hot air balloons. I made a bunch of them for centerpieces at a Parisian-themed wedding reception this year. And a hot air balloon will be a major motif of our Craft Attitude booth at CHA next month. I was inspired to make a hot air balloon card by the Sizzix Pop ‘N Cuts Die Set with Circle Label, designed by “pop” idol Karen Burniston. I turned the circle around and thought, “Hey, that looks like a hot air balloon.” So I came up with this card. I also used a lot of Scrapbooking Attitude printable film on the card stock, because I love marrying custom images with different types of papers and textures.
First I created the pop up mechanism. But before running paper through the die cutter, I printed a photo of clouds I bought on bigstockphoto.com onto Scrapbooking Attitude film, and adhered it onto embossed card stock with a heat laminator. I love how the clouds look on the wavy embossed paper.
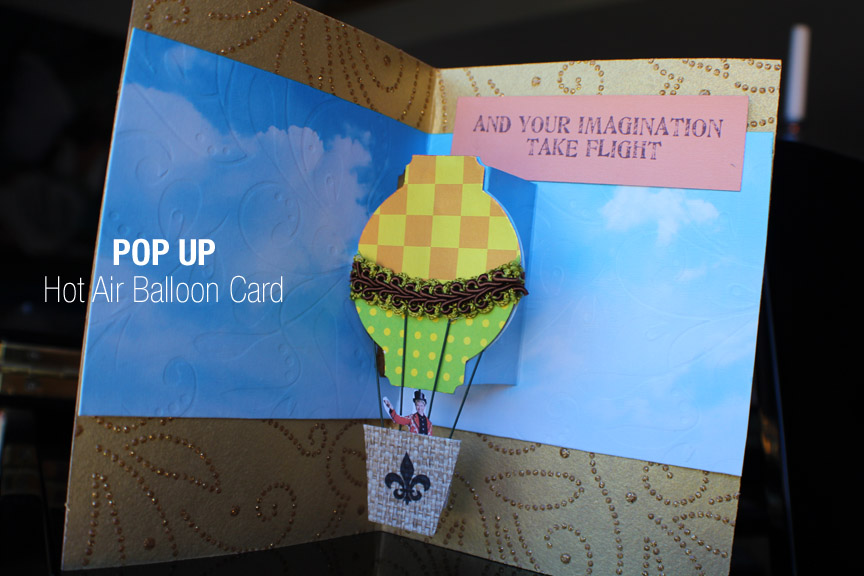
Then I die cut the paper with the Pop ‘N Cuts Die Set to make the Circle Label pop up mechanism.
Next, I ran two different decorative papers through the die cutter again, but only cutting out the circle label. These will be the hot air balloon. Then I cut a curve out of one of the pieces, so that when the two are layered, there is some dimension to the shape. (Actually, the piece that has orange and yellow squares was a custom design I adhered to gold foil paper with Scrapbooking Attitude. I like to use Scrapbooking Attitude to get the exact design I want.)
I attached 5 small pieces of wire to the hot air balloon using glue dots, putting some in between the two paper pieces and some in front.
I made a basket with grasscloth, decorating it with Scrapbooking Attitude to add the fleur de lis. I adhered the film to the grasscloth with a heat laminator, and the design just soaks into. Love how that works. Then I covered up the ends of the wire with some decorative trim.
Now, we need an outer card to hide the pop up mechanism, so I made my own custom card stock by printing an image of a vintage map on some Scrapbooking Attitude, and then adhering it to some copper foil card stock by running it through a heat laminator.
On the other side, I glued a sheet of embossed, beaded paper. This will be the inside of the card. Then I trimmed the card stock to 10″ x 7″, and scored and folded it into a 5″ x 7″ card.
The pop up mechanism sits right in the folded card, and I glued the hot air balloon to the circle label.
Oh, one last detail. On the cover of the card, I created a vintage suitcase. I printed a custom design that said “Let Your Dreams Soar” onto Scrapbooking Attitude and adhered it to a sheet of vinyl using a glue stick. Then I die cut it with the Sizzix Scoreboards Suitcase die designed by my friend Eileen Hull. I didn’t need the whole 3-dimensional suitcase, just the shape of the front and the handle. And I added some trim to the suitcase as well. And for the inside, I printed the words “And your imagination take flight” on Scrapbooking Attitude and adhered it to more of the copper foil card stock. Scrapbooking Attitude is a great way to get images and words onto papers like copper foil; these difficult papers can’t go through a desktop printer, and even if they could, the ink would smudge.
So there you have it. A pop up hot air balloon card. With the help of my Sizzix Pop ‘N Cuts die and Scrapbooking Attitude, my creativity was able to go up, up and away. Now if only I weren’t afraid of heights.


Add a Comment